FPGA Stopwatch
Author Clint Pitzak
The Overall Design
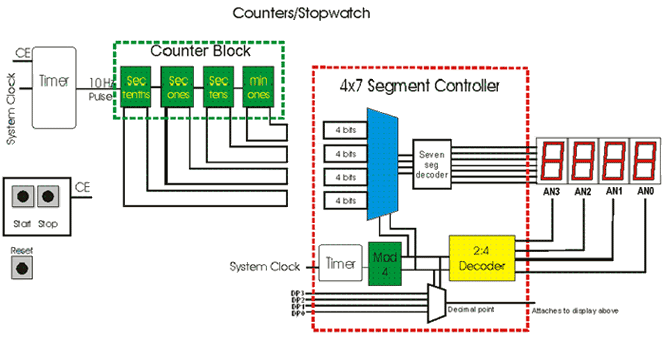
This below graphic show's how it will be implemented
on the FPGA Board
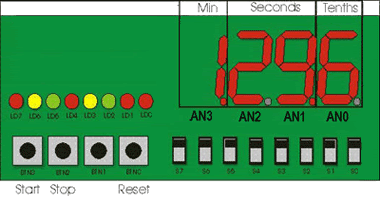
We see that three buttons will be used, Start, Stop and Reset. Also we must remember to enable the decimal point to clearly separate minutes from seconds and seconds from tenths of a second. We rely on the decimal point to make the separation clear since the separator lines we see in our above graphic aren't on the actual FPGA board.
We are now ready to begin our FPGA Stop Watch project.
1. Design and Simulate an SR latch.
An SR latch (SR flip-flop) is a data storage device used to store a bit (1 or 0). The S stand for Set and the R stands for Reset. The SR latch is constructed of two cross-coupled NOR gates. S and R are our inputs and Q and Q' (Q Not) are our outputs.
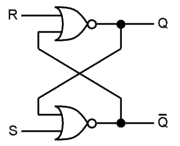
SR latch
We will use the S as our start and the R as our stop. In our
verilog code Q will be named q_plus to denote that Q is our next state
and Q' will simply be named q. Later we will feed the q_plus output to
the Timer.
module sr_latch ( s, r, q, q_plus );
 input s, r;
 output q_plus, q;

 nor (q_plus, r, q);
 nor (q, s, q_plus);

endmodule
2. Design a Mod6 and Mod10 counter.
The truth table and boolean logic can be found here. Referring to the Overall Design graphic above, these counters will make up the Counter Block.The Mod6 will be used for Second Tenths and Second Tens. Our Mod10 will be used for Minute Ones and Second Ones.
Our Mod6 and Mod10 counters should be place in separate verilog source code files.
module mod6 ( ce, q2, q1, q0, inc, clr, clk ); // ce is the Rollover
 input inc, clr, clk;
 output q0, q1, q2, ce; wire n2, n1, n0; assign n0 = (~q1 & ~q0) | (~q2 & ~q0);

 assign n1 = (~q2 & ~q1 & q0) | (~q2 & q1 & ~q0);
 assign n2 = (q2 & ~q1 & ~q0) | (~q2 & q1 & q0);
 assign ce = (~clr & inc & q2 & ~q1 & q0);

 FF_DCE F0 (q0, clk, n0, clr, inc); FF_DCE F1 (q1, clk, n1, clr, inc);
 FF_DCE F2 (q2, clk, n2, clr, inc);

endmodule
module mod10 ( ce, q3, q2, q1, q0, inc, clr, clk ); // ce is the Rollover
 input inc, clr, clk;
 output q0, q1, q2, q3, ce;
 wire n0, n1, n2, n3;

 assign n0 = (~q3 & ~q0) | (~q2 & ~q1 & ~q0);
 assign n1 = (~q3 & ~q1 & q0) | (~q3 & q1 & ~q0);
 assign n2 = (~q3 & q2 & ~q1) | (~q3 & q2 & ~q0) | (~q3 & ~q2 & q1 & q0);
 assign n3 = (q3 & ~q2 & ~q1 & ~q0) | (~q3 & q2 & q1 & q0);
 assign ce = (inc & ~clr & q3 & ~q2 & ~q1 & q0);

 FF_DCE FF0 (q0, clk, n0, clr, inc);
 FF_DCE FF1 (q1, clk, n1, clr, inc);
 FF_DCE FF2 (q2, clk, n2, clr, inc);
 FF_DCE FF3 (q3, clk, n3, clr, inc);

endmodule
You will notice a module is used named FF_DCE in our Mod counters. This module is a flip flop with clear and clock functionality. The code for FF_DCE is provided below.
module FF_DCE(q, clk, d, clr, en);
 input clk, clr, en, d;
 output reg q;

 always @(posedge clk)
 if (clr) q <= 0;
 else if (en) q <= d;

endmodule
3. Build the Counter Block. We don't worry about applying our timing calculations for the 10MHz pulse in this phase. We can simply code inc as the 10MHz pulse and we will apply our timing calculation later.
module counter_block ( Digit4TENTHS, Digit3SECOND_ONES, Digit2SECOND_TENS, Digit1MIN_ONES, inc, clr, clk );input inc, clr, clk;
output[3:0] Digit4TENTHS, Digit3SECOND_ONES, Digit2SECOND_TENS, Digit1MIN_ONES;
wire rollover1, rollover2, rollover3, last_rollover; // last_rollover used for leds [my own fun]
wire q0, q1, q2, a0, a1, a2, a3, b0, b1, b2, c0, c1, c2, c3;
mod6 TENTHS ( rollover1, q2, q1, q0, inc, clr, clk ); assign Digit4TENTHS = {1'b0, q2, q1, q0}; //making it a 4 bit number.
mod10 SECOND_ONES ( rollover2, a3, a2, a1, a0, rollover1, clr, clk );mod10 MIN_ONES ( last_rollover, c3, c2, c1, c0, rollover3, clr, clk );assign Digit3SECOND_ONES = {a3, a2, a1, a0}; mod6 TENS ( rollover3, b2, b1, b0, rollover2, clr, clk );
assign Digit2SECOND_TENS = {1'b0, b2, b1, b0};
assign Digit1MIN_ONES = {c3, c2, c1, c0};
endmodule
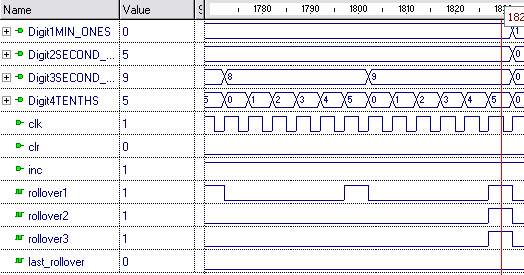
Below is a wave simulation the counter block.
4. Now we make our program timer. The code for the program timer was written by a TA in my class.
module prog_timer (clk, reset, clken, load_number, counter, zero, tp);
 input clk, reset, clken;
 input [23:0] load_number;
 output reg [23:0] counter;
 output reg zero, tp;

wire cnt0;

assign cnt0 = ~(|counter); // is current count = 0?

always @(posedge clk or posedge reset)
  if (reset == 1'b1) // on reset
 begin
 counter = load_number-1; // initialize counter with preload
 zero = 1'b0; // clear ceo output
 tp = 1'b0; // clear tp output
 end
 else if (cnt0 & clken) // if count is 0
 begin
 counter = load_number-1; // initialize counter with preload
 zero = 1'b1; // set the ceo output
 tp = ~tp; // toggle the tp output
 end
 else if (clken) begin
 counter = counter - 24'h000001; // decrement the counter
 zero = 1'b0; // clear the ceo output
 tp = tp; // maintain the tp output
 end

endmodule
5. Complete the entire stopwatch. We will create a test bench
module using:
-the Counter Block
-the 10MHz timer
(our program timer with our timing calculation.
Setting loadnumber to 24'd4999999)
-the RS latch
(controls start/stop functionality)
-the 4x7 segment
controller (used from a past project, contact me if you want this
module)
-3 buttons;
start, stop and reset (pin out file, .ucf. Configuration depends on the
FPGA you use)
module stopwatch_testbench ( Ca, Cb, Cc, Cd, Ce, Cf, Cg, AN0, AN1, AN2, AN3, DP, start, stop, reset, clk,
 , , , ); //Dp0, Dp1, Dp2, Dp3
 input start, stop, reset, clk;
 output Ca, Cb, Cc, Cd, Ce, Cf, Cg, AN0, AN1, AN2, AN3, DP;

 wire q_plus, q;
 wire zero;
 wire[3:0]Digit4TENTHS, Digit3SECOND_ONES, Digit2SECOND_TENS, Digit1MIN_ONES; //sr_latch ( s, r, q, q_plus );

 sr_latch ONOROFF (start, stop, q, q_plus);

 prog_timer STOPWATCH (clk, reset, q_plus, 24'd4999999, , zero, );
 counter_block COUNT ( Digit1MIN_ONES, Digit2SECOND_TENS, Digit3SECOND_ONES, Digit4TENTHS, zero, reset, clk );

 segment_control4to7 CONTROL ( Ca, Cb, Cc, Cd, Ce, Cf, Cg, AN0, AN1, AN2, AN3, DP, ,
 Digit4TENTHS, Digit3SECOND_ONES, Digit2SECOND_TENS, Digit1MIN_ONES, clk, 1'b0, 1'b1, 1'b0, 1'b1 );

endmodule
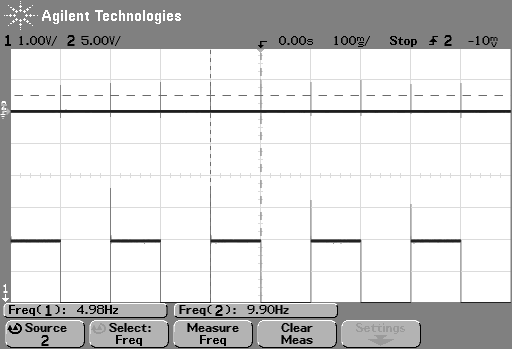
Below is a reading of the FPGA stopwatch on a oscilloscope. An oscilloscope is an electronic instrument that produces an instantaneous trace on the screen of a cathode-ray tube corresponding to oscillations of voltage and current.
If you want the entire .zip file for this project contact me.
top of page